How to Install WPC Wall Panel?
WPC (wood-plastic composite) wall panels are a stylish, low-maintenance way to upgrade your home’s interior or exterior. Whether you’re covering a bathroom, kitchen, or outdoor patio, this step-by-step guide will help you install WPC panels like a pro.
Key Takeaways
- Tools Needed: Drill, level, saw, adhesive, screws.
- Time: 4–8 hours for a 100 sq. ft. wall.
- Cost: 8–20 per sq. ft. (panels + supplies).
- Skill Level: Beginner-friendly (no pros needed).
Why Choose WPC Wall Panels?
- Waterproof: Perfect for bathrooms, kitchens, and outdoor use.
- Durable: Resists scratches, mold, and UV fading.
- Eco-Friendly: Made from recycled wood and plastic.
- Easy to Clean: Wipe with a damp cloth.
Tools & Materials
| Item | Purpose |
|---|---|
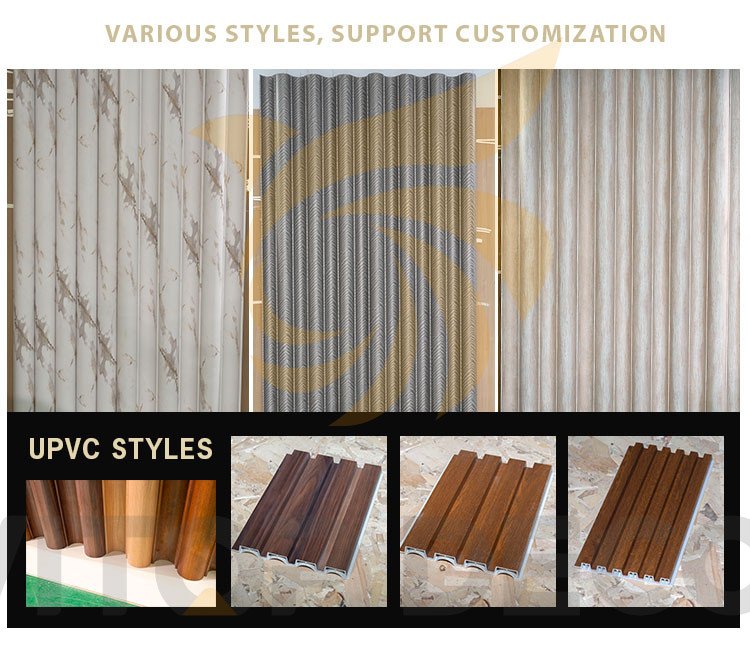
| WPC panels | Choose textures (wood, stone, 3D). |
| Construction adhesive | For strong bonding (e.g., Liquid Nails). |
| Screws or clips | Optional for extra support. |
| Level & tape measure | Ensure straight alignment. |
| Circular saw | Cut panels to size. |
| Caulk & gun | Seal gaps for a polished finish. |
Step 1: Prepare the Wall
- Clean the surface: Remove dust, grease, or old paint with soapy water.
- Fix damage: Fill cracks or holes with spackle; sand smooth.
- Check for level: Use a level to mark a straight starting line.
Tip: For uneven walls, install a wooden or metal frame (battens) first.
Step 2: Plan the Layout
- Dry-fit panels: Lay panels on the floor to plan the pattern.
- Start at the bottom: Begin installation from the base for stability.
- Stagger seams: Offset joints (like brickwork) for a natural look.
Step 3: Cut WPC Panels
- Measure & mark: Use a pencil and ruler for precise cuts.
- Cut panels: Trim with a circular saw or utility knife.
- Sand edges: Smooth rough edges with 120-grit sandpaper.
Safety: Wear gloves and goggles to protect against debris.
Step 4: Apply Adhesive
- Back of the panel: Apply adhesive in zigzag lines or dots.
- Wall application: For heavy panels, add adhesive directly to the wall.
Pro Tip: Use adhesive compatible with your wall type (check the label).
Step 5: Install Panels
- Press firmly: Stick the panel to the wall, aligning with your level marks.
- Secure with screws (optional): Drill screws into studs for extra strength.
- Check alignment: Use a level after each panel to avoid crooked rows.
Note: Wipe off excess adhesive immediately with a damp cloth.
Step 6: Finish & Seal
- Caulk gaps: Fill seams and edges with paintable caulk.
- Add trim: Install corner moldings or baseboards for a clean look.
- Paint (optional): Use acrylic paint to match your decor.
WPC vs. Other Wall Panels
| Feature | WPC | PVC | Wood |
|---|---|---|---|
| Waterproof | ✅ Yes | ✅ Yes | ❌ No |
| Maintenance | None | Low | High (stain/seal) |
| Cost per Sq. Ft. | 8–20 | 5–15 | 15–40 |
| Eco-Friendly | ✅ Recycled | ❌ Plastic | ✅ (if certified) |
Common Mistakes to Avoid
- Skipping surface prep: Uneven walls cause gaps.
- Over-tightening screws: Can warp or crack panels.
- Ignoring expansion gaps: Leave 1/8-inch gaps for temperature changes.

FAQs
Can I install WPC panels over tiles?
Yes! Ensure tiles are firmly attached and use strong adhesive.
Are WPC panels safe for bathrooms?
Yes—they’re 100% waterproof and mold-resistant.
How long do WPC panels last?
15–25 years indoors; 10–15 years outdoors.
Can I install WPC panels alone?
Yes! Lightweight panels make solo work easy.
Case Study: Bathroom Makeover in 6 Hours
- Problem: Moldy, outdated bathroom walls.
- Solution: Installed stone-look WPC panels.
- Results:
- Waterproof walls that look like real stone.
- Saved $1,500 vs. tile installation.
Why Pros Recommend WPC Panels
- Speed: Cover a wall in hours vs. days with tile.
- Versatility: Use indoors or outdoors.
- No Grout: Avoid moldy grout lines in wet areas.
Conclusion: Transform Your Walls in a Day
Installing WPC wall panels is a simple, cost-effective way to add style and durability to any room. With basic tools and this guide, you can create a stunning feature wall or full-room upgrade without hiring pros.
Ready to start? Shop WPC wall panels or download our free installation checklist!
Free samples
In recent years, composite products have become more and more popular all over the world. We believe you will also be interested in this new material. If you are interested, you can come to consult us. We have a professional service team that can not only answer any questions you may have but also provide you with free samples. Let you better understand the composite products. There is no doubt that composite wall panels will be the new future.
Share

James is a content creator and decorator with five years of experience designing home decor. In his daily life, james is constantly on the lookout for the latest, great examples of house design and further optimizes his solutions. Additionally, he writes articles related to outdoor design, interior design, and architectural decorating materials to help brands build more engaging relationships with their audiences.